Tuesday, August 25, 2009

Got milk?

Look what was on our porch when got home from swim lessons?


We were so excited, it was like Christmas! Our very first milk order had arrived! Let's see what is inside..


Milk, eggs, Tully's coffee (yum), half and half...hum, but where is the Yami yogurt I ordered? Oh, Gracie already pulled it out and is opening a carton! Orange and lime yogurt that they say tastes SO good...Okay, this is fun, just like the good old days that I wasn't around to remember, but now can experience for myself...a metal milk box is now on my porch, and I just have to smile because it seems so "vintage-y"! Now if only they'd put their milk inside those cute glass jars...

Monday, August 24, 2009

You know it's love...


When he buys you work gloves! I'm actually serious about this! (I realize it sounds terrible, but I'll explain...)


We were at Home Depot and I saw these cute pink work gloves. I had been wanting some for a while, because his are too big for my hands, but sometimes these gloves really come in handy when you are fixing up an old house! :) I mentioned to him that the next time he was going to buy me flowers, that he could get me some gloves instead because that would be such a great gift! He thought I was joking, but realized I was serious. So now I have these gloves and I can't wait until I have a need to use them. Which in this house, won't be long! :)


Okay, so I think I changed my mind about the wide paneling for our kitchen walls and cupboards...I put up some of it on the side of a cabinet to see what I thought, and my first thought was that I didn't like it at all! So then I pulled out some beaded board and tried that on a different cabinet, and really like it! I definitely don't like the wider stuff on the cabinets. To me it says "rustic cabin", which is fine if that is the desired look, but I am aiming for a "sweet cottage" look...


Here is the first cabinet I did. It looks awful, doesn't it? The reason for this is that this is where we had to saw off the other cabinet before we could take down the half wall. You can see in part where the wall used to be. (The hole in the ceiling is where the range hood vented out into the attic. We pulled that old range hood out, and wired in a simple ceiling fan, so we are just "mudding" with joint compound around that hole for the vent.) When we removed the other cabinet, it badly scarred this one, but it didn't matter because we knew we were putting wainscotting over it. I used a chisel and a belt sander to make it a flat surface again, and then we were good to go! (Oh, and in the background you can see a very untidy cabinet over a little work desk...that is the little computer area my husband put in a year ago, and he is making doors for the cabinet. Which is going to be really nice, because it will hide any disorganization in above the desk!)


So anyway, I measured the cabinet, then measured the piece of paneling...


Used "the square" for a straight-edge and drew my little line. It is a bit off, but because I am adding crown moulding to the top of the cabinet, it can be off by a little...


I lined it up with the blade on the table saw...


And got a nice good look at that big mean blade...and frankly, I told David I couldn't work up the nerve to cut the board myself! I could imagine losing a finger...or two, or a whole hand or something...so he made me a "cross-cut sled", which makes making cross-cuts on wood SO much easier, and much safer too!


I was still nervous the first time I used the table saw, even with this handy thing, but after I tried it, I couldn't wait to do more! Imagine me, just a girl, actually using a power saw! Yea! :)


David cut the boards for this cabinet and I put them together and nailed them up. I just really don't like the look of it, though...we didn't even cut the last board for it...


So the next day when David had finished making the sled jig for me, I gave it a try using beaded board this time...


And really liked this look better! What do you think? Whichever we choose will be from floor to ceiling and on the sides and backs of the cabinets, and we will also cover the bottom half of the dining room walls...


One last thing about this whole learning to use a power saw thing..."Ripping" ~ when you make vertical cuts~ is so much more scary and challenging than "cross cutting"! The third time I did it, I was too timid and failed to push the board all the way through the blade and it shot out from the saw toward me! It didn't hurt, it just really freaked me out! It ruined the wood piece, and really shook me up! But the thing is, I want to learn how to do this too much to just decide it's too scary, so I recut the wood and this time, made fewer mistakes! :) Thankfully, my husband is coaching me through this, and stays right by me when I "rip", wheras I can do it on my own when I make cross-cuts! So just say a little prayer that I'll keep all my fingers here! :0) But the truth is, if you have been wanting beaded board, it is completely do-able! If I can do it, anyone can! And putting it up isn't hard at all! It's actually a lot of fun! :)


Someone else had fun this weekend learning how to use the jigsaw, and David had fun showing him the ropes! :)


Well, I sure hope you had a good Monday! I will be by soon to say hello to you all! :) Have a good night, :)


Thursday, August 20, 2009

Crazy for canisters

Old-fashioned canisters...


I was powerless against these! I found them in my favorite little shop in the town David and I went to for our anniversary, and I decided I had to buy them. I really needed more canisters. Like I need more fabric. Or buttons. Or ribbon. Or colorful spatulas. (I'm sure you get my drift here. I really don't need more canisters! :)


But you can have fun and get creative with them...I saw an idea, I think on the Better Homes and Gardens website, and thought it was cute. They had a few glass jars with flour and sugar and whatnot, and a couple had china cups in them for measuring, SO cute! :)


I was disappointed that mine didn't look as nice as it did on BHG. Why is that anyway? If I can find their picture again, I will be sure to show you it, because it really was such a great picture! :)


So how have you been and how have you been enjoying these last days of summer? Here, it has been warm this week, and we have been drinking sweet tea like there's no tomorrow! I thought I would share the little recipe for it, but it's really simple, so you might recognize it! My mom grew up in the South and this is the tea she always made when I was growing up, only she put more sugar in hers. :) It's simple, but oh-so-good!


Simple Southern Sweet Tea


six Lipton tea bags
*2-3/4 one-fourth cups white sugar

After you put your kettle on to boil the water, put the tea bags and sugar in the pitcher. I need to explain the measurement I gave for the sugar...we experimented with the sugar and found it tasted best a little more than 5/8 c. and not quite 3/4. So we just fill the 1/4 measuring cup 2-3/4 times...you might find it's too sweet or not sweet enough, depending on your taste! :)

Pour boiling water over sugar and tea bags and stir a little.

Let stand overnight or several hours, then add cold water to top. Serve over crushed ice, with a slice of lemon if you like! Enjoy! :)


One last thing:


David took the kids to swim lessons for me this morning, and he was walking with them towards the pool...

Gracie: Daddy, would you rather have a cavity or a Barbie tatoo?

Hearing about this later, I laughed and asked him, "So what did you choose?"

He said he never got to answer, but given the choice, he'd choose the cavity. (Smart guy!) :)

I hope you all have a wonderful Friday! The weekend is the very best part of the week, don't you think?


Monday, August 17, 2009

More kitchen progress pictures


I really hope I'm not boring you all with all this kitchen stuff! I have some more progress pictures, but first, I wanted to say a great big thank you to everyone for your sweet comments regarding my rather pitiful "Down" post! It actually ended up being a really nice two days, even though my husband was at work and the kids were still away! It was quiet, but I got a lot done...And now they are home, and it feels "right" again! :) So all's well that ends well, you know?!

Now about the kitchen, I also wanted to say thanks for your advice on the whole beaded board versus wide paneling issue...I really appreciate you taking to time to comment on this! It helped a lot! :) I think~ although this is always subject to change!~ that we are going to go for the wide paneling! :)

I don't know how most people redo a room, but for us, this kitchen/dining room makeover technically started before last summer...we have done things in these rooms every year, as we had the time and money. This year though, we get to finish most of it up! Here is some of what we have been working on...

Two years ago, my (really kind-hearted) dad helped me tackle a most unpleasant project and we took off all the "popcorn" from the kitchen and dining room ceilings. We then repaired the ceiling and retextured. It made an ENORMOUS difference! (This process gave me the courage to do the living room and hallways by myself last fall.)


My husband finished "mudding" the skylight he had framed in the previous fall, and we textured it at the same time we did the ceilings...It all looked so much better. Last spring we replaced the outdated ceiling light fixture with this chandelier, which is very special to me because it came from a dear friend as a birthday surprise! :)


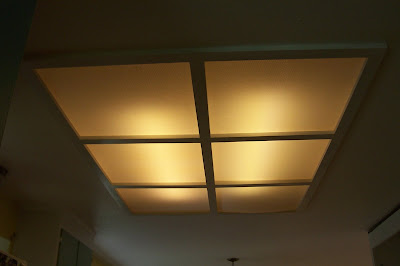
Now our kitchen also bestowed this monstrous ceiling fixture upon us...


It took up practically the entire kitchen, spreading its terrible florescent light throughout the kitchen...not good! So one afternoon late last summer, when I had had enough of it, I got to work...


The wood frame was nailed into the drywall, and had to be pried off.


So when my husband came home from work, it looked like this:


David disconnected the florescent lights and pulled them down...


He put up 2x4s to make a frame for the drywall...


And rewired for recessed lighting, then we put up the drywall.


This is how it looks now, and it is almost ready to be textured and primed/painted. (There is a little story behind the wired "hole" for a light right in the center of the drywall we added; I will have to share that a different day...)


David put in these recessed lights, which give a nice warm light. I am so much more happier with them than what was there before! I can't wait until I look up at the ceiling at don't see joint compound patches, though! :)

I will try to blog on something fun and pretty before doing another post like this, so you don't get too bored! This kitchen has been taking a lot of my time, so I haven't been crafting as much as I like, although I did get to do some while on vacation! :) I will have to show you those things soon! :) I hope you all had a fantastic weekend, and that your week is off to a great start! :)

BLESSINGS,

Wednesday, August 12, 2009

Down

We just got back home from our little trip to Leavenworth (Washington) and I am feeling...well, blue! I never feel sad when we come home because I LOVE HOME! So, I'm kind of at a loss here! I was commenting on a friend's blog that part of it is missing our kids, and I think that is a BIG part of it! But they are in Oregon with their grandparents and we are here...so I will have to be patient and wait for Friday night, when they will come home!

I think part of it also is just the stress of life that comes right back into your life when you get home after a wonderful time away...uh, is our vacation really over? A half completed kitchen~ actually, more like a third finished!~ laundry, and...now that I'm listing this, it really doesn't seem all that monumental at all! But you know how when you feel a little down, everything seems so much worse than it really is? Yep, it's so true! And so I will do what I always do when the blues hit and make sure to get a good night's sleep...after saying a prayer that tomorrow will be a better day! It really just about has to be! :)

I hope your week is going well! :) Oh, and if you haven't read the post just under this one, please make sure to give me any advice on what you think about paneling vs. bead board! We went to Lowe's tonight and I still cannot decide!

Have a blessed night,

Tuesday, August 11, 2009

More kitchen inspiration...


(All of the above pictures are from Cottage Living.)


Do you remember this picture from a previous "kitchen inspiration" post? This picture was found on the Better Homes and Gardens website. There were some aspects of it that I really liked, such as the colors. It has a half wall like ours does, and a beautiful wood floor! It also has white bead board between the counters and cabinets, which was our plan for our kitchen...but now David and I are thinking of wider wall paneling like this:


(Cottage Living)


Not the really wide stuff, just wider than the bead board. Part of the reason is that our kitchen has no good "ending" point where we can put the bead board up just between counters and cabinets, so that it's a definite "backsplash". So we thought we could cover the entire kitchen in bead board, but that didn't seem right. I love, love, LOVE the wider paneling:


(Cottage Living)


We both like it more, and a real "pro" for this kind of wall woodwork is that we can put in floor to ceiling in the whole (small) kitchen and then later on, add it to the lower half in the rest of the dining room/breakfast area, with the yellow walls on top, which would connect the rooms.

So, what do you think? Which do you like better, and what would you do if you were us? Any advice or opinions are welcome! What I will do when I get home from our vacation is show you some whole room pictures of our kitchen so you can get a better visual idea of what would look better~ that would probably help. But until then, please do tell me which you prefer, or think would work best! :)


Okay, now I have another question to ask you...We were also planning on putting bead board to the sides of both our upper and lower cabinets to add visual interest as well as to update them. I found a picture of a kitchen where they had the wider paneling on both the walls and the sides of the cabinets, and it looked really nice. Do you think this would be strange? Should I go with the bead board idea instead? Aagghh! I am so not good at making decisions!

Well, I hope you are all doing well and enjoying these summer days! I know a lot of you are heading back~ or already back~ to a normal school schedule...Take care and have a wonderful day! :)


Sunday, August 9, 2009

On vacation...

At my home away from home...


Just my sweetie and me...


In Leavenworth, Washinton~ a Bavarian themed town...


We are celebrating our (belated) 13th anniversary. (Our "real" anniversary was on July 6th.) We are enjoying this quaint little town, taking walks in town and down by the river. Eating (highly caloric) pastries, playing games, eating out every night (one of my favorite parts)...


And in the afternoon, when it becomes a little too hot outside for us, I take some time to craft and sew! Can you guess what I am making/doing? Of course, I am also taking advantage of the peace and quiet and taking a lot of naps! :)


We love to sit on the little deck outside, and often have our lunch out there.


I love the flowers in the window boxes along the deck railing...there are petunias everywhere in this town! It's just beautiful! I will try to get a picture of some of that for you to see, too, before we leave! :)

I hope you all had a wonderful weekend! :)


Thursday, August 6, 2009

A letter to my son

Twelve years ago...


You rushed into this world, so much earlier than we'd expected.
They told us that you might not even cry,
but they underestimated you~
because you are a fighter.

They gave us the odds, and we prayed
the odds would be in your favor.

I remember...your little face,
those tiny fingers.
You were so unbelievably small,
I wondered how you could survive.

The hardest part was
leaving the hospital
without you.
It wasn't at all how we'd planned.

At first, every time the phone rang,
my heart pounded.
I was sure they were calling to say
you had slipped away.

But then, one morning,
peace came~
an assurance that,
not only were you in God's hands,
you would survive.
It was His promise to me,
and we clung to that.

The weeks passed,
and you grew.
We practically lived at the hospital
with you.
And yet it never got any easier
to leave you behind.

One day,
we got the good news~
A date for your homecoming!
We were so excited,
and so very grateful to God.

And now, I cannot believe
twelve years have passed!
How can that be?
It seems like just yesterday,
we drove away one last time,
this time with you,
and took you home.

And it just wouldn't be home without you.
You are our sweet son,
and when I think of these past twelve years,
I am thankful that God chose us,
for you.

I love you. WE love you!
Please never, ever forget this.

Love,
your Mom


P.S. I just wanted to quickly write and say that I know it's odd that I have added pictures of our cats to my sidebar and not my family yet...in trying to find some good shots of my family, I kept running by cat photos, so they have been added first. But now it really is getting late and I'm off to bed~ I'll finish adding my family tomorrow! Goodnight! :)


Tuesday, August 4, 2009

Kitchen renovation

You know how it's said that sometimes things have to look worse before they look better? I sure hope it's true, because things are looking really bad here in our kitchen as we tear things apart! This was I did a couple of weekends ago~ pulling off the old icky laminate backsplash so it was ready for this past Saturday, when we put in the sink. (Pardon some of these pictures, they are a little out of focus!) I couldn't stand the way this area looked so I "mudded" that part of the wall with joint compound. We are covering it all up with beaded board so it doesn't have to be perfect.


Later after the backsplash was completely removed...So pretty, huh? Uh, yeah...


Now after two coats of joint compound, it will be tolerable until we cover it up! :)


The Sink Dilemma

You'd think choosing a kitchen sink would be rather straightforward. At least, I would have thought so...I was just saving for a standard double bowl cast iron one from Lowe's. The problem: The space for our sink could only fit a 25" sink. We looked online at double sinks this size, but the bowls were itty-bitty. The only way to accomodate a larger one would mean lengthening the counter, which would involve replacing the slider with a single French door vs. a double (losing a lot of light) and framing it all in both inside the house and out. (Too much work!) The solution: I had seen a farmhouse sink on Craigslist, and so I decided that wouldn't be such a bad compromise at all!


Choosing a Countertop


This proved to be a little difficult as well. The problem: We found out we couldn't use laminate with an undermount sink, as the countertop framing in the sink would be exposed, and it could ruin the laminate. We were told we'd have to use a kind of countertop that was solid throughout. At this point, you are looking at a lot of extra $ when selecting a counter. There was this website called SolidSurface.com that will actually sell sheets of solid surfacing, such as Corian or LG HI-Mac, for a pretty fair price. We found a couple of colors we really liked, but found once you buy the right bits and blades for your tools, pay shipping, and so forth, it adds up! The solution: Out of curiousity, we got a quote from Lowe's, and were very surprised that doing it all ourselves would save us either nothing at all, or very little! Needless to say, that was a easy choice!

Sink Installation Day!


Before the company could come and make the template of our countertops, we had to install the farmhouse/apron sink so they could get precise measurements.


Look at the horrid sight behind the dishwasher! Yuck! I will be scrubbing and painting that soon!


Prying the countertop loose...


It finally budged!


A much prettier sight for sure! :)


This is the support system that will hold the sink in place. It was a lot more work than it looks!


Whew, finally it's installed!


(After things were all cleaned up a bit.)


This is our makeshift "back counter" that holds our old faucet for a couple of weeks, until they install our new ones. The new counter will wrap around the back of the sink and they will drill holes for the new faucet on installation day! The new faucet is much better! It's amazing when you take off a counter, how awful it looks! All the parts of the wall you couldn't reach to paint... If I had thought of this before we put in the sink, I would have wanted to remove the cabinets from the wall and clean and paint all I could behind all of it, just for my own sanity. But I will have to settle for removing the dishwasher to clean/paint whatever I can and repainting the cabinets inside and out. We are putting beadboard on the sides of the cabinets and looking into resurfacing the doors/drawers with trim and beadboard. Maybe someday we will replace them, but for now we will make do. :)


I hope this hasn't been too boring for you! I was having a hard time getting myself to show this to you, because it's all still so ugly in our kitchen. But then I thought I should show you, rather than just always tell you, what we are doing! It will eventually be finished and that won't be such a hard picture to show! :)

I hope you are all doing all right! I have been such a terrible blogger friend, pretty much MIA both with blogging and visiting! I am looking forward to having a little more time when the kids go back to school next month! Hopefully things will settle down a little, because this has been a crazy busy summer! I will be around to say hello to you all as soon as I can!

Blessings,


P.S. I hope you don't mind if in the next week, I show you some more of the work we have done in the kitchen! More pictures to come!